


Why Can't I Find Replacement Rotors for My Tiga?
One of the selling points for Tiga formula cars and sports racers back in the 1970s and 80s was that all parts on the cars were designed for racing. Tiga didn't adapt parts from road cars the way most other manufacturers did. Unfortunately, that leaves owners of the now-orphaned cars out in the cold when it comes time to replace worn or broken parts.
The original front brake rotors used from 1976 through 1981 were a one-piece casting that included the disc, hat, and hub. This is similar to the arrangement used on the front of many rear-wheel-drive American cars (and probably many others around the world, I haven't checked them all). The goal of this conversion is to separate the disc/hat from the hub and to modify the hub to accept a more common disc/hat.
Warning
This modification destroys the original rotor. It is not reversible and there are no second chances. Please double-check all measurements and instructions with your machinist. This document is intended as a guide only. We will not be held responsible for errors, omissions, or misunderstandings. If something does not sound right, please stop and ask! I will not be offended if you point out an error, or if you find a better / easier / cheaper way.
Modification Summary
The Swift DB-3 Brake Rotor (Pegasus Part Number 3545-30) is the best available basis for this conversion. We will cut the rotor off of the hub, leaving the bolt flange intact. The bolt flange will also be cut (from the back side) to 3/8" thick. The bolt holes in the rotor will need to be enlarged to accommodate the 7/16" Tiga wheel bolts. The modified rotor will bolt to the back side of the hub bolt flange using the original Tiga bolts.
Details and Critical Dimensions
The original assembly was designed with the inner friction surface of the disc flush with the inner "end" of the hub. The Swift rotor measures 1 5/8" from the inner friction surface to the outer hat surface. In order to position the new rotor correctly, the distance from the finished back side of the bolt flange to the inner end of the hub should be 1 5/8". The flange should be 3/8" thick when the machining is done, but this is not the critical measurement.
The ID of the Swift rotor is 3". The inner "snout" of the hub tapers from just over 3" at the end to approximately 3.15" where it meets the flange. This snout should be cut down to 3" OD all the way to the flange. Be sure to allow a generous radius at the junction to avoid stress cracking. An alternative is to enlarge the ID of the rotor to 3.15", but the goal of this conversion is to make future disc changes as easy as possible.
The bolt circle diameter of the rotor is correct, but the holes are only 3/8" diameter. These holes should be enlarged to 7/16" while keeping the same bolt circle.
Other Materials Needed
You will need to re-use the aluminum Tiga wheel spacer. If your lug bolts are in good shape, re-use them. If not, replace them with new 7/16-20 UNF x 2.5" long socket-head cap screws. Now is a good time to replace the nuts holding the spacer on with new AN365-7 locknuts. You should also replace the wheel bearings while everything is apart (LM29749/29710 inner and LM67048/67010 outer). You will need two Swift DB-3 rotors of course (Pegasus Part No. 3545-30). Finally, two sections of 3" OD x .120" wall steel tubing, each about 1/2" long, will prevent the wheel bolts from turning when you change wheels.
Instructions
Here are the instructions I gave my machinist. Not being a machinist myself, I could be using incorrect terminology. Be sure your machinist is clear on what you want done. Miscommunication between you and your machinist is between you and your machinist!
- Cut the rotor and most of the "bell" off of the hub, leaving the flange at full OD.
- Face the back of the flange, leaving the distance from the inner end of the hub to the back face of the flange at 1.625".
- Turn down the OD of the hub on the 1.625" long side to 3".
- Enlarge the bolt holes in the new rotor from 0.375" to 0.4375", keeping the same 3.75" PCD.
The Finished Product
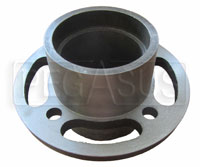
The machined hub should look like this when viewed from the back side:
The DB-3 rotor should now fit against the back of the hub flange, and the inner friction surface of the disc should be flush with the inner end of the hub:
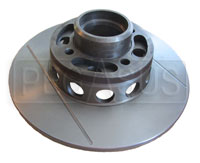
The flange will be sandwiched between the Swift rotor and the Tiga wheel spacer, held in place by the lug bolts. Install the four bolts from the back side of the rotor, slip on the Tiga wheel spacer, and install the AN365-7 locknuts.
Holding the Lug Bolts in Place
The downside to this new arrangement is that the lug bolts lose their press fit, which originally prevented them from turning. When you look inside the original rotor, you can see that the heads of the lug bolts are pressed into recesses cast into the hub. We removed that portion of the hub to let the new rotor slip on without modification.
The 7/16-20 lug bolts should have a 0.65" OD head. That leaves a gap of 0.05" between the bolt head and the hub. Wedging something into that gap will help to prevent the bolts from turning.
A piece of 3" OD x 0.120" wall tubing makes a good wedge. It only needs to be about half an inch long; it should not be any longer than 1". Use a file or bench grinder to slightly taper the outside of the tubing at one end. You don't need to make a sharp edge, just make it thin enough to fit between the bolt heads and the hub. Cut a gap in the tubing (if you have DOM tubing, I suggest cutting along the weld seam). Place the opened tubing over the inner end of the hub and press it down until it wedges between the lug bolt heads and the hub. Drive it home with a ball peen hammer and a punch. You don't need a massive hammer or huge swings. Tap it down until it is firmly jammed in place, like you would do if you were installing wheel bearing races.
Which brings us to the last step: Install the new wheel bearing races in the hub, pack the new wheel bearings, and reinstall the hub/rotor assembly.